FARO® QUANTUM MAX
ARM | SCANARM
FAROBlu® LLP
FARO® QUANTUM MAX ARM | SCANARM
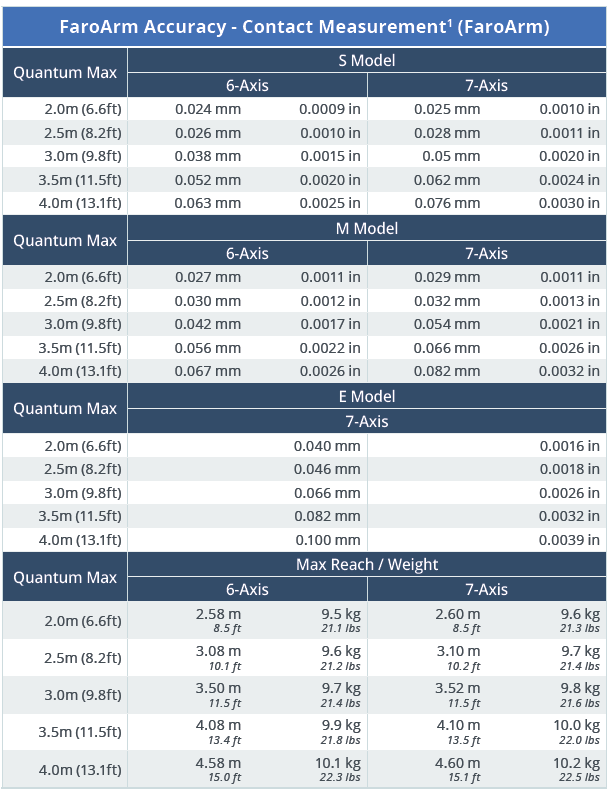
Three FaroArm models offer basic, standard, and premium performance options—available in various working volumes from 2.0m to 4.0m. Improved rigidity and stability deliver optimized accuracy and repeatability with superior performance while maintaining shop-hardened ruggedness for use in the harshest factory environments. The new 2.0m working volume arm delivers the best accuracy in its size category
Each FaroArm model comes with up to 25% longer reach, offering more comfortable articulation for better extension over and around larger objects positioned within its specified working volume. Combined with the FARO exclusive 8-Axis Max rotary worktable, the need to relocate or reposition the device is virtually eliminated—and inspections can be completed in a fraction of the time.
The MAXimum by FARO®
The new Quantum Max offers 2 times the versatility from previous models. Dual kinematic seats allow for hard probe and LLP interchangeable mounting positions to easily move the LLP from top to front mount, enabling greater access to small spaces or hard to reach areas without the need to recalibrate. The quick release handle also offers dynamic holding options.
Three FaroArm models offer basic, standard, and premium performance options—available in various working volumes from 2.0m to 4.0m. Improved rigidity and stability deliver optimized accuracy and repeatability with superior performance while maintaining shop-hardened ruggedness for use in the harshest factory environments.
The new 2.0m working volume arm delivers the best accuracy in its size category.
Each FaroArm model comes with up to 25% longer reach, offering more comfortable articulation for better extension over and around larger objects positioned within its specified working volume.
Combined with the FARO exclusive 8-Axis Max rotary worktable, the need to relocate or reposition the device is virtually eliminated—and inspections can be completed in a fraction of the time.
This LLP is ideal for high-precision tasks with tight tolerances to capture data at highest accuracy and best resolution possible. Users can scan small intricate parts and fine details with up to 30% better accuracy and resolution than the xP, improving production quality with better and more reliable data.
This LLP offers the ability to scan anything with a balanced coverage blend of xR accuracy/resolution and xS speed — increasing profitability and throughput with performance suitable for any application.
This LLP is best for large parts or expansive surface areas when data collection speed is top priority. The extra‑wide laser stripe delivers double the coverage in a single pass, allowing users to collect data over 65% faster than the xP. Fewer passes to collect data means faster results and higher productivity.
With the Quantum Max, choosing between these options is now seamless. Three unique models help boost productivity collectively or individually. All LLPs come with the exclusive FARO Continuous Light Rectifications (CLR) scanning technology, providing users with the highest quality scan data possible on dark, translucent, and reflective surfaces.


1 Contact Measurement (FaroArm) : In Accordance with ISO 10360-12; defined as EUNI (Unilateral Error) - Distance error between two points comparing measured versus nominal. Values are +/-
2 Non-Contact Measurement (ScanArm and ScanArm + 8-Axis): Based on ISO 10360-8 Annex D; defined as LDIA (Sphere Location Diameter Error) - Diameter of the spherical zone containing the centers of a sphere measure from multiple orientations. Values are absolute
For the complete set of specifications in accordance with ISO 10360-12 please visit www.faro.com
Meets OSHA requirements, NRTL TÜV SÜD C-US Listed, Complies with Electronic Code of Federal Regulations 47 CFR PART 15, 17 CFR Parts 240 and 249b – Conflict Material, 21 CFR 1040 Performance standards For Light-Emitting Products, and 10 CFR Part 430 – Department of Energy; Energy Conservation for External Power Supplies.
Complies with the following EC Directives: 93/68/EEC CE Marking; 2014/30/EU Electrical Equipment; 2014/53/EU Radio Equipment Directive; 2011/65/EU RoHS2; 2002/96/ EC WEEE; 2006/66/EC WEEE; 2006/66/EC Batteries and Accumulators; 2014/35/EU Low Voltage Directive; 2009/125/EC Ecodesign requirement.
Conforms to the following standards: EN 61010-1:2010 / CSA-C22.2 No. 61010-1; CISPR 11:2015; EN/IEC 61326-1:2020 EMC; ETSI EN 300 328 V2.1.1; ETSI 301 489-1 V1.9.2; ETSI 301 489-17 V2.2.1; ETSI EN 62311:2008; IEEE 802.11 b/g; FCC Part 15.247 (WLAN and Bluetooth); Japanese Radio Law MPT No. 37 Ordinance (MIC classification WW); UN T1-T8; IEC 62133
2nd ed.; IEC 60825-1:2014 ed3.0; FDA (CDRH) 21 CFR 1040.10 / ANSI Z136.1-2007; EN 50581:2012; 21 CFR 1002 (Records & Reports); 21 CFR 1010 (Performance Standards).
Shock and Vibrations Testing per International Electrotechnical Commission (IEC) Standards: IEC 60068-2-6; IEC 60068-2-64; IEC 60068-2-27 Extreme Temperature Cycling (-20°C to 60°C). Based on: IEC 60068-2-1; MIL-STD-810G; ISTA

SCANNING | METROLOGY | ENGINEERING
